Java Setup Notes: Difference between revisions
vvajcomsn.com |
No edit summary |
||
| (44 intermediate revisions by 25 users not shown) | |||
| Line 3: | Line 3: | ||
Having a good environment setup is essential for everything you will be doing with Java ME - writing, compiling, packaging, debugging, obfuscating, tearing your hair out etc etc. Use the instructions here to setup your environment on Windows or OS X (currently experimental). | Having a good environment setup is essential for everything you will be doing with Java ME - writing, compiling, packaging, debugging, obfuscating, tearing your hair out etc etc. Use the instructions here to setup your environment on Windows or OS X (currently experimental). | ||
< | <h2>Java + Wireless Toolkit</h2> | ||
#Java Standard Edition Development Kit (JDK) - you need to have some version of Java installed on your machine. Try to get version 1.4.2 (or later). This is essential for development. NOTE: You MUST have the JDK installed before you install the Java Wireless Toolkit as you will need the tools it contains (such as javac) to compile and run your MIDlets. | |||
#Download it here: http://java.sun.com/j2se/downloads/index.html. Get the version without any other bundled software. It should be called something like JDK 5.0 Update 8. | |||
#Java ME, Wireless Toolkit (WTK). This contains the essential tools that we need to build, package and install mobile applications. Download it here: http://java.sun.com/products/j2mewtoolkit/. Get the [J2ME Wireless Toolkit 2.2 http://java.sun.com/products/sjwtoolkit/download-2_2.html], or if you feel living on the bleeding edge - grab the Sun [Java Wireless Toolkit 2.5 for CLDC, Beta http://java.sun.com/products/sjwtoolkit/download-2_5.html](the toolkit formerly known as J2ME Wireless Toolkit). Careful, you may cut yourself. | |||
#I'm going to assume that you will install this into the <pre>C:\WTK\</pre> directory - if you install it somewhere else, just modify the paths accordingly. | |||
<h2>Paths</h2> | <h2>Paths</h2> | ||
To play nicely with the grown-ups, Java needs to know where all your files are, so we need to add the location of the Java binaries to the system path. | To play nicely with the grown-ups, Java needs to know where all your files are, so we need to add the location of the Java binaries to the system path. | ||
< | <h3>Windows 95/98</h3> | ||
Go to Start->Run. Type in <em>command</em>. Then type | |||
</ | <pre>SET PATH=%PATH%;C:\WTK\bin</pre> | ||
You should also edit your C:\autoexec.bat file to include this line, so you don't have to enter it every single time you restart your computer. After you've done this, you should be able to run the tools included in the Java Wireless Toolkit from any directory on your system. | |||
<h3>Windows 2000/XP</h3> | <h3>Windows 2000/XP</h3> | ||
| Line 82: | Line 29: | ||
<p>A good way to test if this worked is to type the preverify command without any arguments in the command line. You should see something like this on your screen. </p> | <p>A good way to test if this worked is to type the preverify command without any arguments in the command line. You should see something like this on your screen. </p> | ||
<pre> | <pre> | ||
C:\> preverify | C:\> preverify | ||
Usage: PREVERIFY.EXE [options] classnames|dirnames ... | Usage: PREVERIFY.EXE [options] classnames|dirnames ... | ||
where options include: | where options include: | ||
-classpath <directories separated by ';' | -classpath <directories separated by ';'> | ||
Directories in which to look for classes | Directories in which to look for classes | ||
-d <directory> Directory in which output is written | -d <directory> Directory in which output is written | ||
@<filename> Read command line arguments from a text file. | @<filename> Read command line arguments from a text file. | ||
</pre> | </pre> | ||
<h2>Emulators</h2> | <h2>Emulators</h2> | ||
< | <h3>Windows</h3> | ||
Depending on your target device, you should download and install the SDK for that particular handset or family of handsets from the manufacturer's site. Since this course is based around the Nokia Series 60 handsets, we're going to grab the Nokia Series 60 2nd Edition SDK, Feature Pack 2 and 3 as well as the Nokia Series 60 3rd Edition SDK (for the N80). You'll also need to get serial numbers for these SDKs, so don't forget to request those as well. | |||
Download them from here: | |||
[http://www.forum.nokia.com/info/sw.nokia.com/id/6e772b17-604b-4081-999c-31f1f0dc2dbb/S60_Platform_SDKs_for_Symbian_OS_for_Java.html Series 60 SDKs] | |||
<h3>Mac OS X</h3> | <h3>Mac OS X</h3> | ||
None of the manufacturers have bothered to port their SDKs for the Mac, and neither has Sun, but there | None of the manufacturers have bothered to port their SDKs for the Mac, and neither has Sun, but there are a number of ways to develop MIDP 1.0 and 2.0 applications on OS X using either | ||
* MPowerplayer + EclipseME + Eclipse OR | |||
* Apache Ant, MPowerplayer and J2ME Polish. OR | |||
* Netbeans + MPowerplayer OR | |||
* Mobile.Processing + MPowerplayer. | |||
Whichever method you choose, you're going to need MPowerplayer. | |||
<h5>MPowerplayer MIDP 2.0 SDK</h5> | |||
# Download this from http://www.mpowerplayer.com/products-sdk.php | |||
# Save the file somewhere in your src folder and unzip it. On my machine this looked like this: | |||
<pre> | |||
/Users/michael/src/mobile/mpp-sdk | |||
</pre> | |||
# [Optional] I like making shortcuts so that it's easy for me to run the application. Fire up your favourite editor and type this | |||
<pre>java -jar /Users/michael/src/mobile/mpp/player.jar $1 &</pre> | |||
and then save that somewhere in your path as '''mpp'''. I saved it as <pre>/Users/michael/mpp</pre> | |||
Then, make it executable by typing: | |||
<pre>chmod 755 mpp</pre> | |||
Now, all you need to do to run JAD/JAR files in the emulator is type <pre>mpp [filename.jad/filename.jar]</pre> | |||
<h5>Apache Ant</h5> | ---- | ||
<h5>Apache Ant (OPTIONAL - ONLY FOR J2ME POLISH USERS)</h5> | |||
# Download Apache Ant from http://download.nextag.com/apache/ant/binaries/apache-ant-1.6.5-bin.tar.gz | # Download Apache Ant from http://download.nextag.com/apache/ant/binaries/apache-ant-1.6.5-bin.tar.gz | ||
# Save it somewhere easy and memorable - on my machine I save all my downloaded source files to <pre>/Users/michael/src</pre> | # Save it somewhere easy and memorable - on my machine I save all my downloaded source files to <pre>/Users/michael/src</pre> | ||
| Line 163: | Line 104: | ||
This means that Ant is installed and we're ready to roll. | This means that Ant is installed and we're ready to roll. | ||
<h5>J2ME Polish (OPTIONAL - ONLY FOR ADVANCED STUDENTS)</h5> | |||
<h5>J2ME Polish</h5> | |||
# Download [http://j2mepolish.org/downloads/j2mepolish-2.0-beta1.html J2ME Polish]. I got the latest 2.0 beta version. It seems to work well. | # Download [http://j2mepolish.org/downloads/j2mepolish-2.0-beta1.html J2ME Polish]. I got the latest 2.0 beta version. It seems to work well. | ||
# Run the downloaded JAR file | # Run the downloaded JAR file | ||
| Line 211: | Line 119: | ||
mpp dist/Sony-Ericsson-P900-en_US-example.jad | mpp dist/Sony-Ericsson-P900-en_US-example.jad | ||
</pre> | </pre> | ||
# I included a modified build.xml with extensive comments file in the [http://uberthings.com/teaching/mobile_application_design/1/code.zip HelloMidlet] code samples. Open it up in a text editor and read through to learn how it works. | # I included a modified build.xml with extensive comments file in the [http://uberthings.com/teaching/mobile_application_design/1/code.zip HelloMidlet] code samples. Open it up in a text editor and read through to learn how it works. | ||
<h5>Building</h5> | <h5>Building</h5> | ||
| Line 218: | Line 126: | ||
# Copy the build.xml file into your MIDlet's directory. | # Copy the build.xml file into your MIDlet's directory. | ||
# Check the paths inside the build.xml file to ensure that they're pointing to the right folders for your source folders, Mpowerplayer and J2ME Polish | # Check the paths inside the build.xml file to ensure that they're pointing to the right folders for your source folders, Mpowerplayer and J2ME Polish | ||
# Type ant. Watch the magic unfold. | # Type ant. Watch the magic unfold. | ||
<h2>IDE's</h2> | <h2>IDE's</h2> | ||
Latest revision as of 20:10, 10 September 2007
Setting up your environment
Having a good environment setup is essential for everything you will be doing with Java ME - writing, compiling, packaging, debugging, obfuscating, tearing your hair out etc etc. Use the instructions here to setup your environment on Windows or OS X (currently experimental).
Java + Wireless Toolkit
- Java Standard Edition Development Kit (JDK) - you need to have some version of Java installed on your machine. Try to get version 1.4.2 (or later). This is essential for development. NOTE: You MUST have the JDK installed before you install the Java Wireless Toolkit as you will need the tools it contains (such as javac) to compile and run your MIDlets.
- Download it here: http://java.sun.com/j2se/downloads/index.html. Get the version without any other bundled software. It should be called something like JDK 5.0 Update 8.
- Java ME, Wireless Toolkit (WTK). This contains the essential tools that we need to build, package and install mobile applications. Download it here: http://java.sun.com/products/j2mewtoolkit/. Get the [J2ME Wireless Toolkit 2.2 http://java.sun.com/products/sjwtoolkit/download-2_2.html], or if you feel living on the bleeding edge - grab the Sun [Java Wireless Toolkit 2.5 for CLDC, Beta http://java.sun.com/products/sjwtoolkit/download-2_5.html](the toolkit formerly known as J2ME Wireless Toolkit). Careful, you may cut yourself.
- I'm going to assume that you will install this into the
C:\WTK\
directory - if you install it somewhere else, just modify the paths accordingly.
Paths
To play nicely with the grown-ups, Java needs to know where all your files are, so we need to add the location of the Java binaries to the system path.
Windows 95/98
Go to Start->Run. Type in command. Then type
SET PATH=%PATH%;C:\WTK\bin
You should also edit your C:\autoexec.bat file to include this line, so you don't have to enter it every single time you restart your computer. After you've done this, you should be able to run the tools included in the Java Wireless Toolkit from any directory on your system.
Windows 2000/XP
- Go to Control Panel -> System.
- Click on the Advanced Tab
- Click on the Environment Variables button
- Double-click the PATH variable in the System variables box
- At the end of the Variable value field, add the path to your J2ME WTK installation - for me this is something like ;C:\WTK
- If you had to install the J2SE SDK too, it's a good idea to add the paths for that as well - for me this was C:\j2sdk1.4.2_03;C:\j2sdk1.4.2_03\bin.
A good way to test if this worked is to type the preverify command without any arguments in the command line. You should see something like this on your screen.
C:\> preverify
Usage: PREVERIFY.EXE [options] classnames|dirnames ...

where options include:
   -classpath <directories separated by ';'>
                  Directories in which to look for classes
   -d <directory> Directory in which output is written
   @<filename>    Read command line arguments from a text file.
Emulators
Windows
Depending on your target device, you should download and install the SDK for that particular handset or family of handsets from the manufacturer's site. Since this course is based around the Nokia Series 60 handsets, we're going to grab the Nokia Series 60 2nd Edition SDK, Feature Pack 2 and 3 as well as the Nokia Series 60 3rd Edition SDK (for the N80). You'll also need to get serial numbers for these SDKs, so don't forget to request those as well. Download them from here:
Mac OS X
None of the manufacturers have bothered to port their SDKs for the Mac, and neither has Sun, but there are a number of ways to develop MIDP 1.0 and 2.0 applications on OS X using either
- MPowerplayer + EclipseME + Eclipse OR
- Apache Ant, MPowerplayer and J2ME Polish. OR
- Netbeans + MPowerplayer OR
- Mobile.Processing + MPowerplayer.
Whichever method you choose, you're going to need MPowerplayer.
MPowerplayer MIDP 2.0 SDK
- Download this from http://www.mpowerplayer.com/products-sdk.php
- Save the file somewhere in your src folder and unzip it. On my machine this looked like this:
/Users/michael/src/mobile/mpp-sdk
- [Optional] I like making shortcuts so that it's easy for me to run the application. Fire up your favourite editor and type this
java -jar /Users/michael/src/mobile/mpp/player.jar $1 &
and then save that somewhere in your path as mpp. I saved it as
/Users/michael/mpp
Then, make it executable by typing:
chmod 755 mpp
Now, all you need to do to run JAD/JAR files in the emulator is type
mpp [filename.jad/filename.jar]
Apache Ant (OPTIONAL - ONLY FOR J2ME POLISH USERS)
- Download Apache Ant from http://download.nextag.com/apache/ant/binaries/apache-ant-1.6.5-bin.tar.gz
- Save it somewhere easy and memorable - on my machine I save all my downloaded source files to
/Users/michael/src
- Here is the process. To try keep things clean, we're going to be installing into /usr/local.
tar -zxvf apache-ant-1.6.5-src.tar.gz
cd /usr/local
sudo mkdir ant
cd ant
sudo cp -R ~/src/apache-ant-1.6.5/bin .
sudo cp -R ~/src/apache-ant-1.6.5/lib .
- Set up the paths in your environment
pico ~/.bash_login
Add these lines somewhere
export ANT_HOME=/usr/local/ant
export JAVA_HOME=/Library/Java/Home
export PATH=${PATH}:${ANT_HOME}/bin
Shut down your shell, open it up again and type
ant

You should see something like this

Buildfile: build.xml does not exist!
Build failed
This means that Ant is installed and we're ready to roll.
J2ME Polish (OPTIONAL - ONLY FOR ADVANCED STUDENTS)
- Download J2ME Polish. I got the latest 2.0 beta version. It seems to work well.
- Run the downloaded JAR file
- Choose the GPL or Evaluation license
- Select the directory where you installed the MPP-SDK as the path to your wireless toolkit.
- Test if everything installed correctly by running one of the J2ME Polish sample applications
cd /Applications/J2ME-Polish/samples/menu
ant
- You should see a few messages from Ant letting you know that it's building the application. The build is configured to store all the JAD and JAR files inside the dist folder.
- Once it's done, if you created a shortcut to the MPowerplayer SDK like I suggested above, you should be able to run it by typing something like
mpp dist/Sony-Ericsson-P900-en_US-example.jad
- I included a modified build.xml with extensive comments file in the HelloMidlet code samples. Open it up in a text editor and read through to learn how it works.
Building
To build applications with J2ME Polish, Mpowerplayer and Ant, you need to do the following:
- Copy the build.xml file into your MIDlet's directory.
- Check the paths inside the build.xml file to ensure that they're pointing to the right folders for your source folders, Mpowerplayer and J2ME Polish
- Type ant. Watch the magic unfold.
IDE's
Eclipse
Eclipse is a fantastic open source Java Integrated Development Environment (IDE) which has a few sweet J2ME plugins. The one I use the most is called EclipseME. Although Eclipse is cross-platform, EclipseME doesn't work very well on OS X. OS X works nicely with EclipseME and the MPowerplayer SDK.
Windows
- Download Eclipse from http://www.eclipse.org/downloads/. Install it somewhere easy - like C:\eclipse
- Configuring and install EclipseME using the excellent installation and configuration instructions here to guide you through this process.
- Once you're done - we're ready to start coding! Yeah!
OS X
- Install EclipseME from the download site.
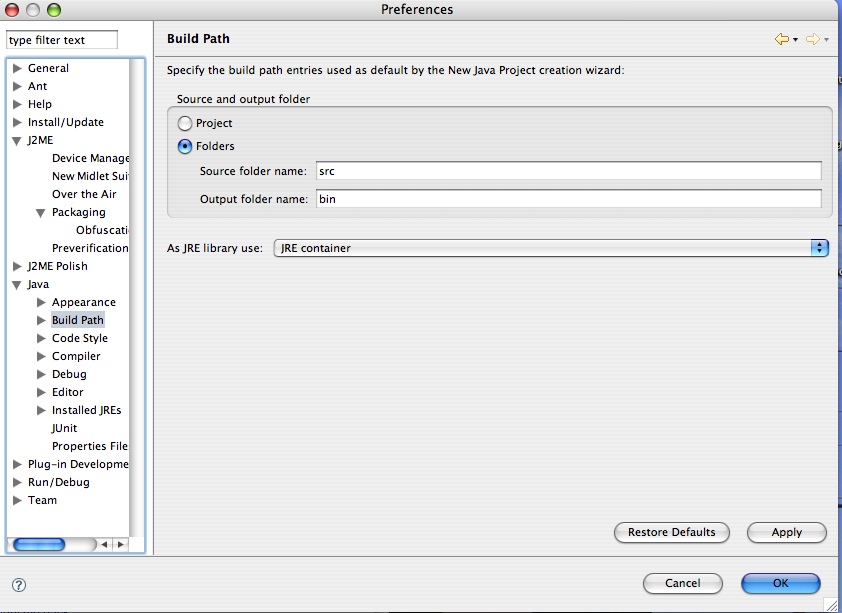
- Go to Window->Preferences. Select J2ME.
- When it asks you for the WTK Root - select the folder where you installed the Mpowerplayer SDK - for me it was /Users/michael/src/mobile/mpp-sdk.
- Go to Device Manager. Hit Import. Select the Mpowerplayer directory again. It will only find one emulator. Select it.
- Hit Apply. Then ok.
Initial Directory structures
- For my projects, I like to set up my source files in the /src folders of my projects and all external files to be in /res - this is how you do it in Eclipse.
Netbeans
Download Netbeans from Sun here - http://www.netbeans.org/. I don't use it much, but I've heard good things. Let me know how it treats you.
Mobile.Processing
Mobile.Processing is an open source programming environment for people who want to design and prototype software for mobile phones. It is based on and shares the same design goals as the open source Processing project. Sketches programmed using Mobile Processing run on Java Powered mobile devices. Mobile.Processing is extremely easy to get up and running with, but has some drawbacks which will prevent us from using it.
Mobile.Processing is available for both Windows and Mac OS X. Download it here.